Yes, same happens for me. Will investigate.
Edit: Yes, I found this issue. Will be fixed in next release. For now, you have to use the search bar to select ‘GPIO’ or ‘Other’ values.
Yes, same happens for me. Will investigate.
Edit: Yes, I found this issue. Will be fixed in next release. For now, you have to use the search bar to select ‘GPIO’ or ‘Other’ values.
Hi, it’s possible to run RD on a BuildRoot image. An image compiled on BuildRoot can decrease boot time.
I don’t know as I have never experimented with that, sorry 
Hello,
where does RealDash store vehicle settings and import value settings under Raspberry Pi OS?
I’m using RealDash on a Pi 5 with a Waveshare CAN HAT in my DIY electric car to monitor battery voltage, power, SOC, etc.
Unfortunately, my file system got corrupted while I was trying to integrate an additional USB-CAN adapter.
I’ve now set up a fresh system on a new SD card. I’ve re-imported the CAN.xml files, but the gauges are showing incorrect scaling factors or are operating in reverse.
This information must be stored in a settings file that I’d like to import so I don’t have to configure everything from scratch.
Regards, Jörn
Hi Jörn! The settings are in $XDG_DATA_HOME/realdash/, which is normally ~/.local/share/realdash/. Each gauge’s own range, direction and gauge math are saved in the dashboard .rd file, by default in ~/Documents/RealDash/.
I would be super interested if you where willing to share a link to the screen. Thanks.
Thanks. Now I just have to figure out how to get everything installed on a raspberry pi and get it working. All new to me. Ugh.
As someone who knows nothing about Raspberry Pi or Linux let alone programming, I would say it was middle of the road in difficulty. I think I had some posts earlier in this thread of the final code I needed to get mine working. Lots of struggle bussing through it and lots of googling to find what was needed to make it work, at the end of the day it’s like a dozen commands but figuring out the dozen commands took some time. And even now I’m running bluetooth CANBUS which has a quarter second of lag, but trying to get the hardline connection wired up and talking to it is too much effort for me to try. On the plus side it has been very reliable.
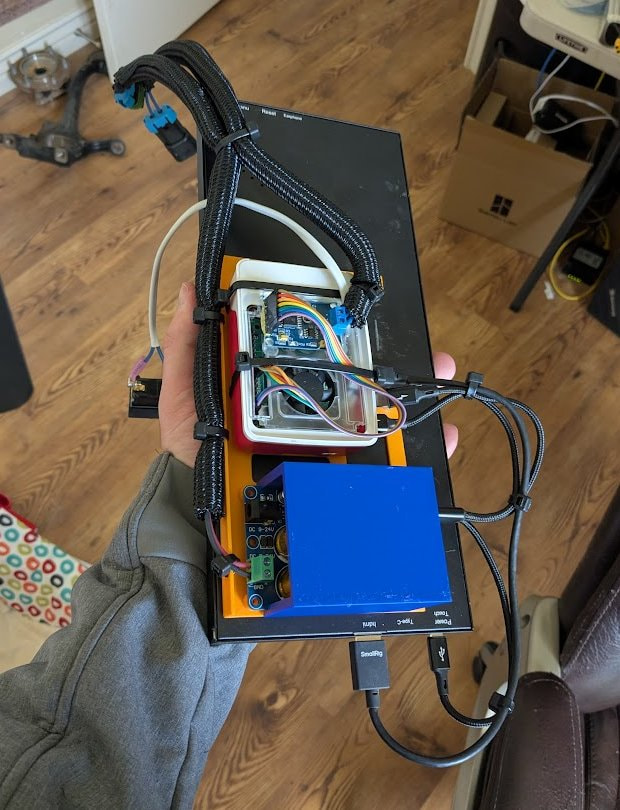
One upgrade I did from my original setup was install a capacitor bank to power everything, you can get a dedicated one for the Pi for pretty cheap. It lets you run 12V to the bank, it charges up, and then can distribute power to the Pi and the screen so you end up with only a single power cord running to the screen. Without it the Pi would lose power when cranking and the screen would turn off so you wouldn’t have gauges until 30 seconds after the car has been running. Even now it’s finicky at best but better than it was. The screen will stay on once the car is turned off since I don’t have anything triggering it to turn off, but the capacitors will drain shortly and the screen will turn off. I ran all of that to a bracket that bolts to the back of the screen. I also wired in a switch to manually turn on/off the screen since sometimes it doesn’t turn on or gets confused in the process, there are two terminals you short out on the Pi for on/off so I ran those to a push button that’s tucked behind the dash as a manual override if the Pi doesn’t boot or I want to manually restart it.